Animations and Real-Time Canvas Rendering
Last year, we introduced Animation Support in MAUI, making it easier to build fluid, responsive map experiences. With our recent14.3 release, that same functionality is now available for our Desktop users on both WPF and WinForms.
In this post, we’ll look at ways to take advantage of the new animation features and real-time canvas rendering. Whether you're building a vehicle tracking system with smooth, continuous panning or a rotating map with labels that dynamically adjust on the fly, these updates make it easier than ever to deliver high-performance, interactive map experiences on the desktop.
Tip
To see these features in action, just clone the HowDoI samples, run the solution and then click on the ‘Vehicle Navigation’ under the ‘Map Navigation’ section of the samples, and also the 'Render Labels' sample under the 'Vector Data Styling' section.
Animations
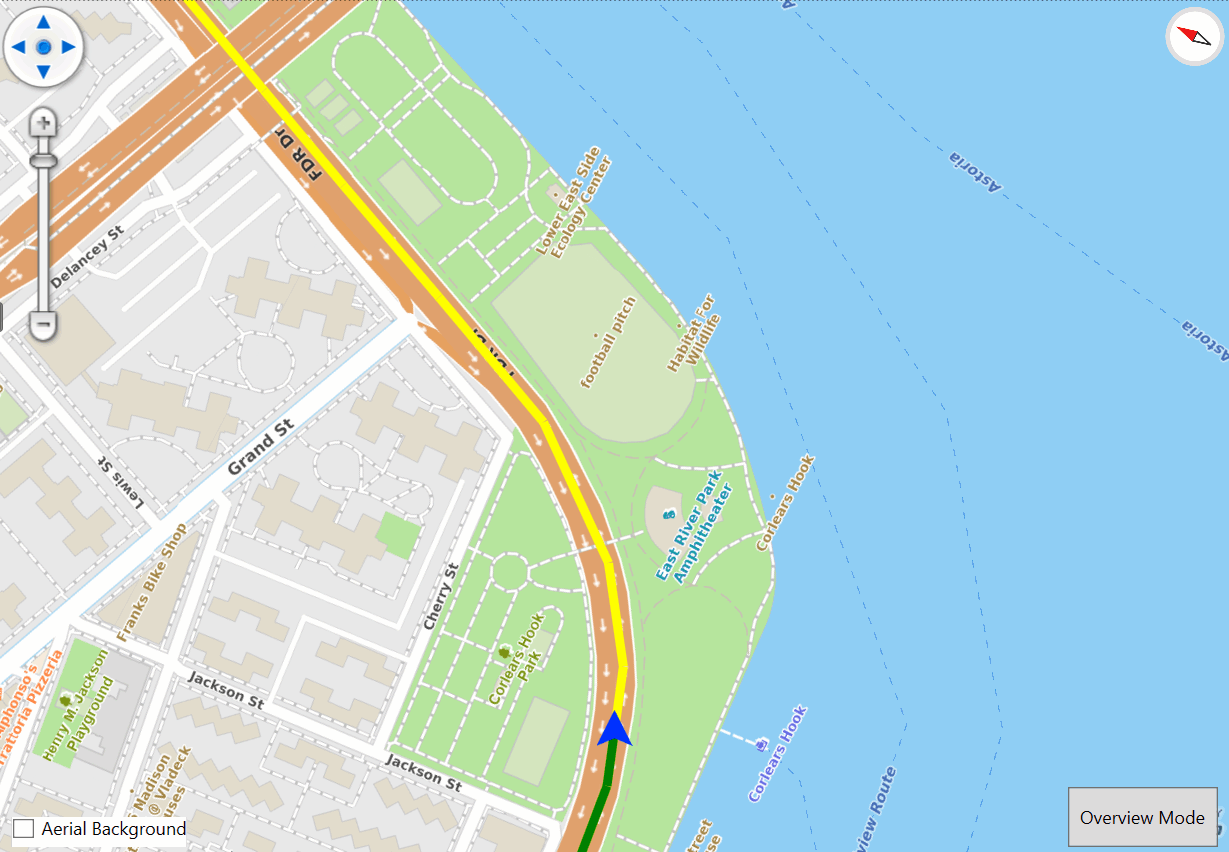
Image 1: ‘HowDoI' Sample demonstrating animations in a sample vehicle tracking application.
A great example of map animations in action is shown in Image 1, where the map smoothly rotates and renders in real time as the vehicle moves.
To see this live on your local machine, just clone the ‘HowDoI’ sample and look at the ‘Vehicle Navigation’ app. This makes use of the new MapAnimationSettings on the MapView’s DefaultAnimationSettings property. This property controls the default behavior for all map refresh actions—unless explicitly overridden by a specific zoom, center, or pan call.
Here’s a quick example of how to set this property:
        //set the DefaultAnimationSettings to manage map refresh actions.
        MapView.DefaultAnimationSettings = new MapAnimationSettings
        {
            Type = MapAnimationType.DrawWithAnimation,  //Can also be set to DrawAfterAnimation.
            Duration = 1000,  // duration of the animation in milliseconds.  Default is 150 and 0 specifies no animation.
            Easing = Easing.Linear   //CubicInOut is default.
        };
The code above will produce a very smooth animation like the one shown in the Navigation Sample. The MapAnimationSettings class has 3 properties:
Type - This is set to a value of the MapAnimationType enum. Your options are DrawWithAnimation or DrawAfterAnimation.
Duration - This is simply the duration of the animation in milliseconds.
Easing - Null / Linear is the default.
By changing these 3 properties, you can create any Animation you want.
It’s also worth exploring the CurrentExtendChangedInAnnimation event. Below is an example of handling this event and updating the sample’s routes and markers.
  // Add an event handler to the MapView's CurrentExtentChangedInAnimation property.
  MapView.CurrentExtentChangedInAnimation += MapViewOnCurrentExtentChangedInAnimation;

  // Implement the event handler to run each time the animation's extent changes.
  private void MapViewOnCurrentExtentChangedInAnimation(object sender,
  CurrentExtentChangedInAnimationMapViewEventArgs e)
  {
    if (!MapUtil.IsSameDouble(e.FromResolution, e.ToResolution))
        return;

    // Update the routes and markers.
    UpdateRoutesAndMarker(e.Progress);
  }
Real-Time Canvas Rendering
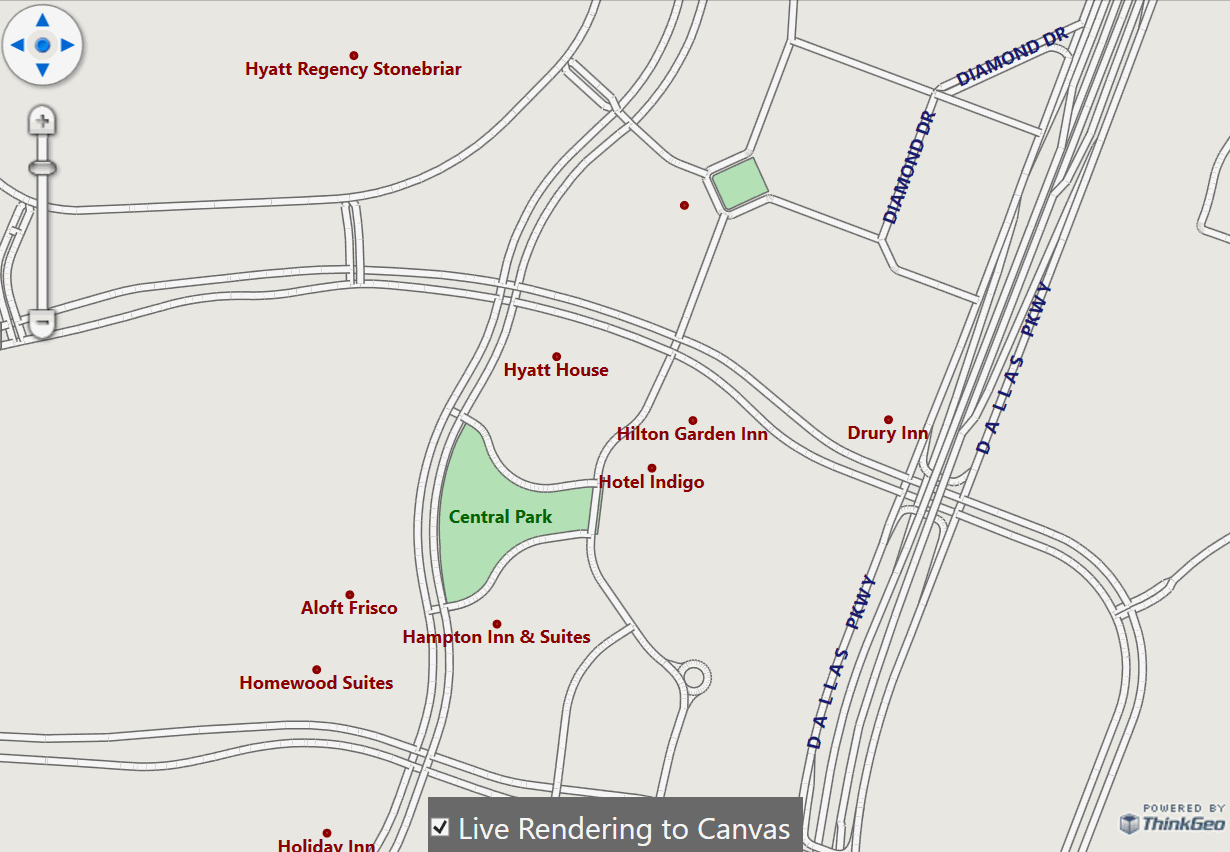
Image 2: ‘HowDoI' Sample demonstrating real-time canvas rendering with labels.
The new 14.3 release also introduces the new FeatureLayerWpfDrawingOverlay class that can be used to render features directly to the Canvas in real-time.
Here in Image 2, you’ll see the user rotating the map by holding the <Alt> key while panning. Labels are smoothly redrawn with correct orientation, fully respecting the label overlap rules defined in your code.
With the new FeatureLayerWpfDrawingOverlay class, any layers added to this overlay will automatically have their labels dynamically render right-side-up as the user rotates the map. There are no additional properties or styles that need to be set in the code. Just by using the new Overlay instead of the usual LayerOverlay will enable this functionality on its own.
Below is a snippet taken from the ‘Render Labels’ sample. You can see that it’s very familiar code where you add Layers to the Overlay, and that’s all there is!
  // Create the new FeatureLayerWpfDrawingOverlay instead of the usual LayerOverlay.
  FeatureLayerWpfDrawingOverlay _featureLayerWpfDrawingOverlay = new FeatureLayerWpfDrawingOverlay();

  // Create your Layers that will be added to the new Overlay:
  var hotelsLayer = new ShapeFileFeatureLayer(@"./Data/Shapefile/Hotels.shp");
  var streetsLayer = new ShapeFileFeatureLayer(@"./Data/Shapefile/Streets.shp");
  var parksLayer = new ShapeFileFeatureLayer(@"./Data/Shapefile/Parks.shp");

  // add the layers to the new overlay and add the overlay to the map:
  _featureLayerWpfDrawingOverlay.FeatureLayers.Add(parksLayer);
  _featureLayerWpfDrawingOverlay.FeatureLayers.Add(streetsLayer);
  _featureLayerWpfDrawingOverlay.FeatureLayers.Add(hotelsLayer);
  MapView.Overlays.Add(_featureLayerWpfDrawingOverlay);
Summary
We hope you’ve found today’s post useful. If you have questions, or if you have a topic you'd like us to explore further, we’d love to hear from you! Email us at sales@thinkgeo.com or schedule a meeting to talk in person. We always enjoy connecting with our customers, learning how you’re using ThinkGeo, and finding new ways to improve our products.
About ThinkGeo
We are a GIS software company founded in 2004 and located in Frisco, TX. Our clients are in more than 40 industries including agriculture, energy, transportation, government, engineering, IT, and defense. We pride ourselves on our excellent service and transparency. ThinkGeo offers a variety of products and services to meet almost any GIS application need. We can even help you develop your next project - anywhere from a few hours of consulting to outsourcing an entire project. To learn more, email us at sales@thinkgeo.com, or call us direct at 1-214-449-0330.
